
Read this article in: Deutsch
Direct Message Injection (DMI) delivers simulated phishing emails directly to your users' inboxes using a secure Microsoft Graph API connection. This method bypasses the need for IP whitelisting and provides faster, more reliable delivery than traditional SMTP.
Prerequisites / Who can use DMI?
You can use Microsoft DMI if your organization meets these conditions:
-
Your mailboxes are hosted entirely on Microsoft 365 Exchange Online.
-
All users receiving the simulation emails are in a single Microsoft 365 tenant.
-
All email domains are owned and managed by your organization.
Limitations
DMI is not supported in the following cases:
-
You use an on-premise or hybrid Exchange server.
-
Users are spread across multiple Microsoft 365 tenants.
-
You use non-company domains (e.g.,
@hotmail.com).
DMI injects an email directly into a mailbox, bypassing standard delivery filters.
However, post-delivery security tools, such as Microsoft Defender, still process emails after they arrive. You must still configure any post-delivery tools to ensure our simulation emails are not quarantined or flagged.
Defender is included in the following Microsoft plans:
-
Office 365 E5,
-
Microsoft 365 E5 Security
-
Microsoft 365 E5 include Microsoft Defender for Office P2 licenses
-
Microsoft 365 Business Premium includes Microsoft Defender for Office 365 P1 licenses.
See full details here.
Benefits of using DMI
Here are the main advantages of using DMI over standard SMTP delivery:
-
Improved email delivery: Traditional SMTP delivery can cause simulation emails to be caught by spam filters or quarantined. DMI bypasses these filters by delivering emails directly via a secure API connection, ensuring they reach user inboxes.
-
Simplified whitelisting & less maintenance: You no longer need to whitelist or maintain our list of IP addresses. With DMI, you only need to grant access to our Azure Enterprise App, giving you more effective control over system access.
-
Quicker setup: The setup process is faster as it reduces the dependency on your IT team for mail server changes. This allows you to launch your awareness program more quickly.
Step 1: Connect SoSafe to Microsoft Entra ID
-
Log into your SoSafe Manager.
-
Navigate to Settings / Integrations.
-
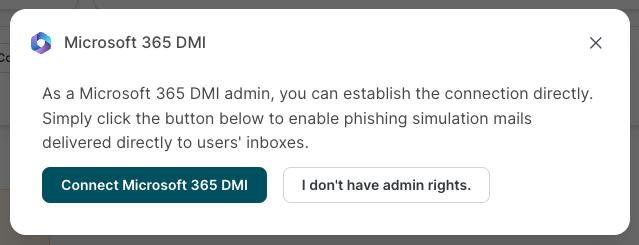
Find the Microsoft 365 DMI card and select Connect.
If you do not see this option, please contact your Customer Success Manager to have it activated.
-
In the dialog window, choose the option that applies to you:
-
If you have Microsoft Entra admin access:
-
Select Connect Microsoft 365 DMI. A Microsoft login window will open.
-
Log in with your Microsoft admin account.
-
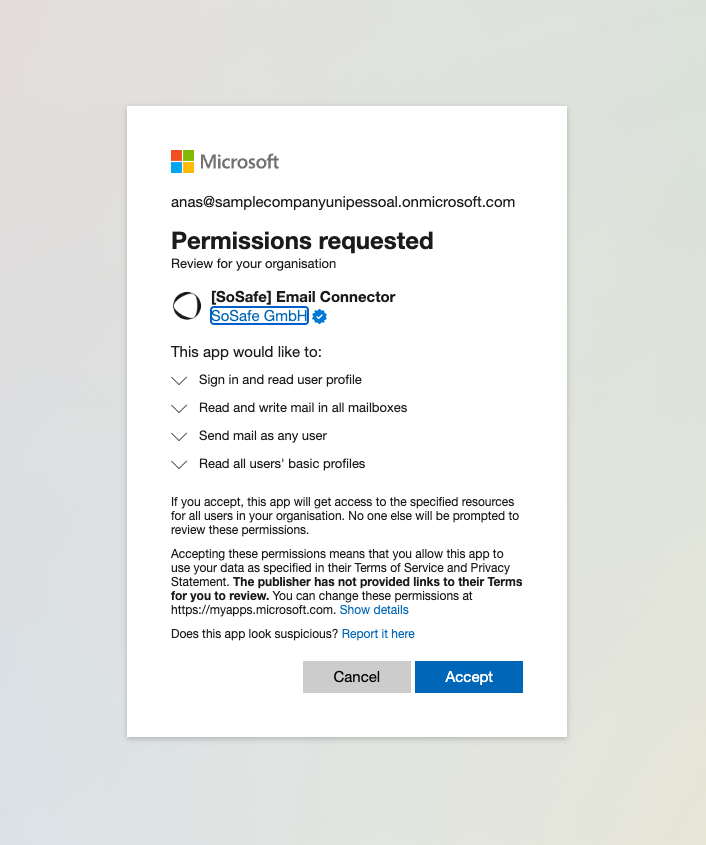
Review the required permissions for the SoSafe Email Connector application.
-
Select Accept to authorize the integration.
-
Once the connection is successful, you will see a green "Connected" status in the SoSafe Manager.

-
-
If you do not have admin access:
-
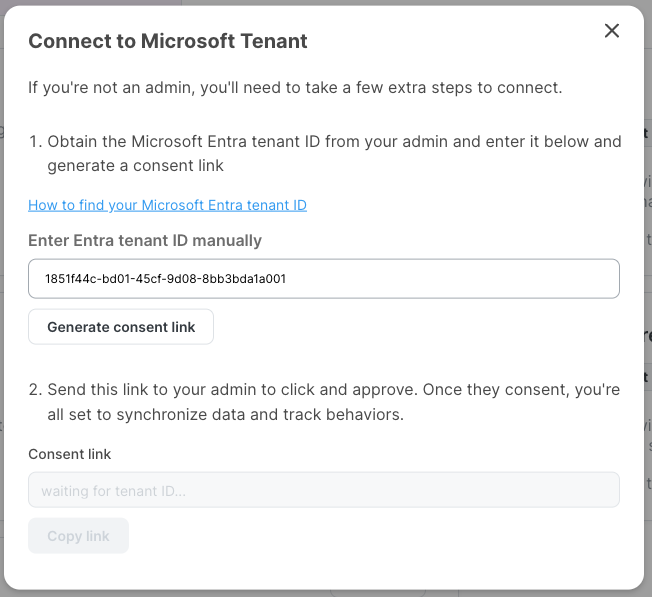
Select I don’t have admin rights.
-
Ask your Microsoft Entra admin for your organization’s Tenant ID.
-
Enter the Tenant ID in the corresponding field and select Generate consent link.
-
Select Copy Link and send this link to your Microsoft Entra admin to approve the authorization.
-
Important: Once the admin has approved the authorization, you must visit Settings / Integration in the Manager. You don’t need to do anything, but visiting the page initializes the connection.
Step 2: Testing the integration
To ensure DMI is working properly, send a test email:
-
In the SoSafe Manager, go to Settings > Integrations.
-
Find the Microsoft 365 DMI card and select Edit.

-
Enter an email address that belongs to your Microsoft tenant.
-
Select Send Test Email.
-
Check the inbox of the test account. You should receive a test phishing email.
-
In the SoSafe Manager, go to Emails > Email log to confirm the email status is "Delivered". If you did not receive a test email, try disconnecting the integration and reestablishing it by following the steps above a second time. If this does not work, reach out to your Customer Success Manager.
We recommend following this guide as well to remove unsafe link warnings for SoSafe emails: Whitelisting domains with safe links (Microsoft Defender)
How to disconnect the DMI integration
If you need to disable DMI, you can disconnect the integration from the SoSafe Manager.
-
In the SoSafe Manager, go to Settings > Integrations.
-
Locate the Microsoft 365 DMI card and select Edit.
-
Select Disconnect.
Important: This only removes the connection from SoSafe’s side. To fully revoke permissions, a Microsoft Entra Admin must manually remove the SoSafe app from the Entra ID dashboard.
What permissions does SoSafe require in Microsoft Entra ID?
SoSafe requires two permissions to deliver simulated phishing emails through DMI:
-
user.readbasic.all: Allows SoSafe to read basic user profiles within Microsoft Entra ID.
-
mail.readwrite: Enables SoSafe to identify inbox locations and inject phishing simulations correctly.
For further assistance, contact SoSafe Support or your Customer Success Manager.
Troubleshooting & support
Test email not received
If the test email does not appear in the inbox, check the following:
-
Confirm the recipient's email address exists and is active in your tenant.
-
Make sure all required API scopes or OAuth permissions were granted during the setup.
-
Review your Microsoft Defender for Office 365 policies to ensure they are not flagging or quarantining the simulation emails.
-
Check Emails / Email log in the SoSafe Manager and check whether the email is marked as “Delivered” and not “Rejected” or “Failed”.
If problems persist, try disconnecting and re-authorizing the integration from scratch or contact your Customer Success Manager for help.
Alternative: SMTP delivery
If DMI setup is not possible due to technical or policy constraints, you can continue to use our traditional IP-based whitelisting for email delivery. Your Implementation Manager can assist you with this setup. You can also find more information in our Knowledge Base: Microsoft 365 - Whitelisting / DMI | Traditional whitelisting steps