Installation manual for Exchange
This document shows you how to install the SoSafe Phishing Report Button as an add-in for Outlook when using Microsoft Exchange.
With the Phishing Report Button, all your employees can report emails directly in their Outlook mail program as a phishing attempt. If the email is one of our simulated phishing emails, the user will receive a message that this phishing attempt has been detected correctly. If the email is not from us, it is automatically forwarded to the IT department, which can then inspect it. You are free to choose the forwarding address.
Requirements
One of the following servers is required:
Exchange 2016 - Version 15.1.225.42 (RTM) or later
Exchange 2019
To install the Phishing Report Button you need a manifest file. This can be downloaded from the SoSafe Manager via: "Phishing Report Button > Email Integrations > Phishing Report Button manifest".
The button can be used in the following programs after the installation is complete:
Outlook 2016 (or higher) for Windows
Outlook 2016 (or higher) for Mac
Outlook Web Access (for Exchange 2016 or higher)
Outlook for iOS
Outlook for Android19 for Mac
Outlook 2013 is not supported anymore.
Note: Microsoft does not fully support the use of add-ins in shared mailboxes. Further details regarding add-in support are available on this Microsoft page.
Installation
Step 1
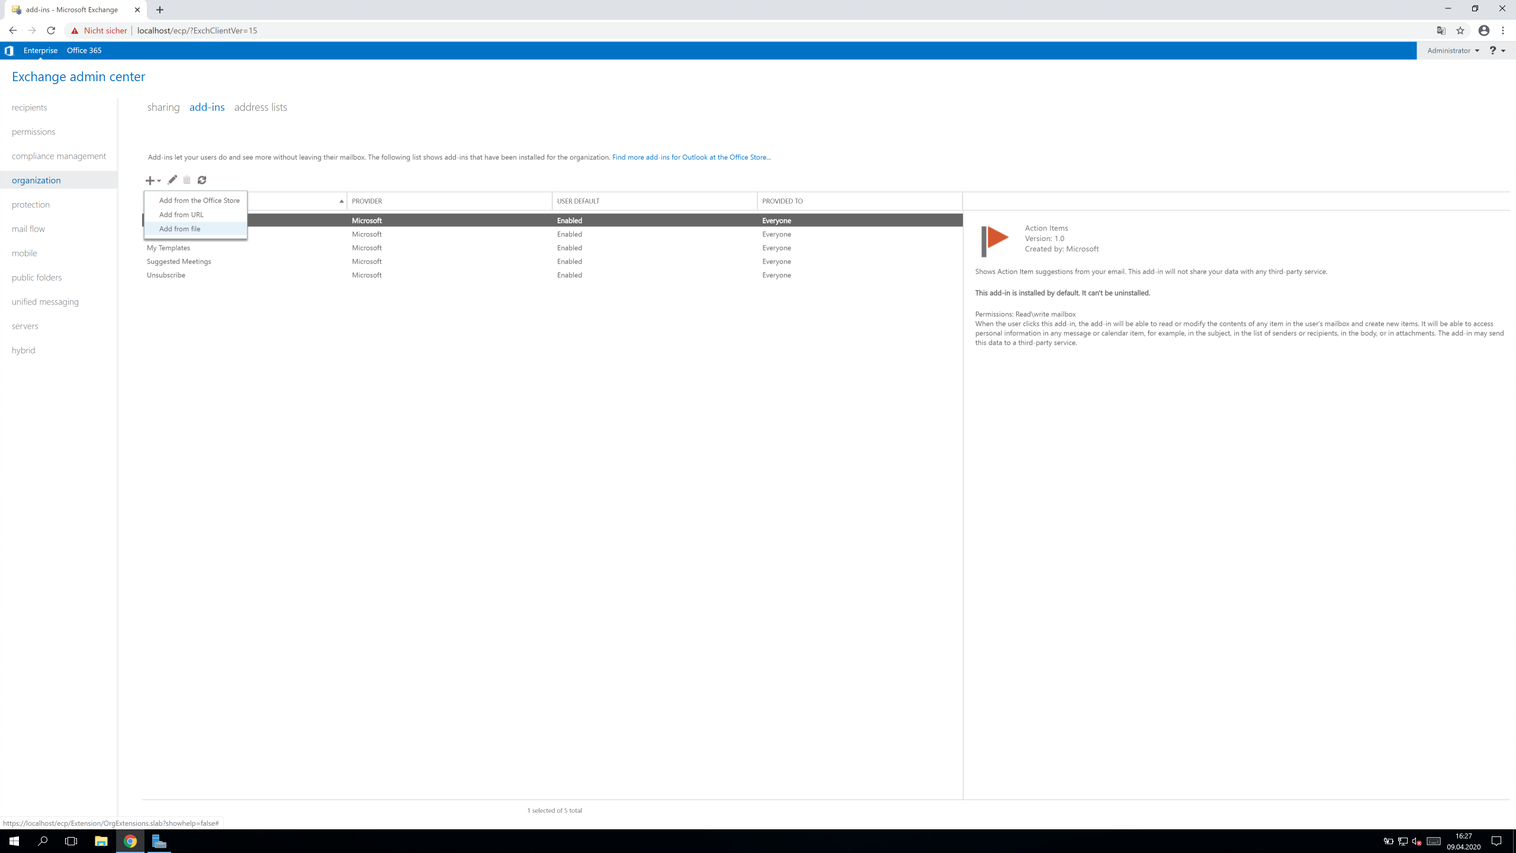
Log in to your Exchange Admin Center and go to the "Organization" menu. Then go to the "Add-Ins" tab. Use the + symbol to select the "Add from file" activity.

.jpeg?inst-v=21342855-1efc-463a-8b11-72797e9af430)
Step 2
Select the manifest file (sosafe-manifest.xml) you received from us and click "Next".
.jpeg?inst-v=21342855-1efc-463a-8b11-72797e9af430)
Step 3
The add-in should now appear in the list of loaded add-ins.
.jpeg?inst-v=21342855-1efc-463a-8b11-72797e9af430)
Step 4
Click the pencil icon to edit the add-in settings. Select the "Make this add-in available to users in your organization" checkbox. Select one of the three available options:
Optional, enabled by default: Use this setting if you want to allow users to disable the add-in.
Optional, disabled by default: Use this setting if you want to allow users to enable the add-in.
Required, always enabled. Users cannot disable this add-in: Select this setting if you do not want your users to disable the add-in. (SoSafe recommendation)
.jpeg?inst-v=21342855-1efc-463a-8b11-72797e9af430)
With the Exchange Management Shell, you can limit add-in availability to specific distribution groups. To do this, the appropriate distribution group must be configured in the Exchange Admin Center in the "Recipients" menu on the "Groups" tab.
ATTENTION: Please note that the add-in roll out for specific users for OnPremise installations only allows for a maximum of 1000 users. You can only decide between user lists with up to 1000 users or a roll out to all users. In the latter case, you are finished with the installation on this point.
Then run the following commands in the Exchange Management Shell. Please use a user with Domain Administration privileges:
Get-App -OrganizationApp | Format-List DisplayName,AppId
The list of Add-Ins appears as output. Find the add-in "SoSafe Phishing Reporting" and copy the AppId.
Then run the following command. Replace the placeholder for the distribution group accordingly:
$a = Get-DistributionGroupMember <Distributiongroup>
Finally, run the following command - and replace the placeholder for the AppId accordingly
Set-App -Identity <AppId> -OrganizationApp -ProvidedTo SpecificUsers -UserList $a.Identity -DefaultStateForUser Enabled
For control purposes, you can have the add-ins listed with their configured properties:
Get-App -OrganizationApp | Format-List DisplayName,AppId,Enabled,DefaultStateForUser,ProvidedTo,UserList
You should receive an output as follows:
DisplayName: | SoSafe Phishing-Reporting |
AppId: | e10f7be1-f108-4275-9387-ee5d8fa30c81 |
Enabled: | True |
DefaultStateForUser: | Enabled |
ProvidedTo: | SpecificUsers |
UserList: | {SoSafeSRV.local/Users/Administrator, SoSafeTest.local/Users/…} |
Important:
The script assigns the privileges only to those user who are members of the group when executing the script. If you add new users or revoke users from the group, you need to run the script again.
In case there are regular changes in the user group, please configure a task/job to run the script on a daily basis. This can be done using the Windows Task Scheduler.
Note:
The add-in will be made available to you in Outlook within the next 12-24 hours after completing the steps described above.
Uninstallation
If you no longer wish to use the SoSafe Phishing Report Button, you can uninstall it in two easy steps.
Step 1
In the Exchange Admin Center, go to the "Organization" menu and the "Add-Ins" tab. Select the "SoSafe Phishing Reporting" add-in there. Thenclick on the erase icon.
.jpeg?inst-v=21342855-1efc-463a-8b11-72797e9af430)
Step 2
A pop-up window will open and ask for your confirmation, click "Yes".
